MAKE (formerly Integromat) is a powerful automation tool that connects various platforms and services, enabling seamless workflows. For WordPress users, MAKE can automate tasks like AI-generated content posting, saving time and effort while maintaining efficiency. This guide explains how to set up an automated workflow for posting AI-generated content to your WordPress site.
The Need for AI-Powered Post Automation in WordPress
WordPress is a user-friendly platform that enables anyone to create and manage content for their website. It’s widely used by bloggers and marketers worldwide. However, regular posting and frequent updates can consume significant time and effort. This is where post automation becomes invaluable.
By automating posts with AI, WordPress users can streamline tasks like content creation, scheduling, and publishing. Automation tools such as Make.com simplify these processes without requiring any coding skills, allowing users to focus on growth and strategy rather than repetitive manual tasks.
Steps for Automated Blogging
The blog automation process covered in this guide can be divided into three main stages:
- Collecting Content Using Inoreader
Use the Inoreader tool to gather articles and content from various websites efficiently. - Generating Content with ChatGPT API
Leverage the ChatGPT API to create blog posts, including the body, title, and images, tailored to your needs. - Automatically Posting to WordPress
Automatically upload the generated content to your WordPress site, streamlining the publishing process.
In the following sections, I’ll provide a detailed explanation of how to execute each step.
Content Gathering Stage
Inoreader Setup and Feed Configuration

Introduction to Inoreader
Inoreader leverages RSS (Really Simple Syndication) technology to automatically collect the latest web content. By setting up specific keywords, it allows users to access content related to their interests without manually visiting multiple websites. While RSS typically requires some technical knowledge, Inoreader simplifies the process, making it accessible to everyone.
Signing Up for Inoreader
Inoreader is a beginner-friendly platform for creating and managing RSS feeds. Its key advantage lies in the ability to collect the latest information automatically based on diverse keywords and topics.
Setting Keywords in Inoreader

- Log in to Inoreader: Visit the Inoreader website and log in to your account.
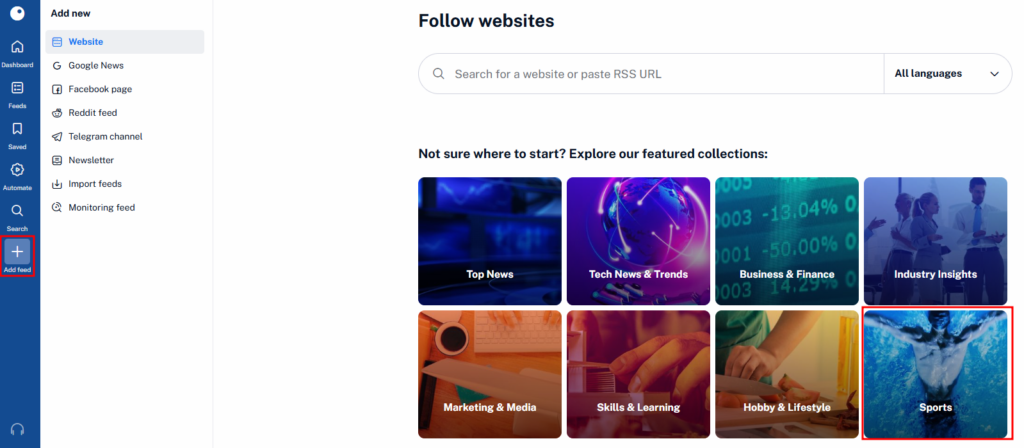
- Select a Topic: Choose a topic of interest, and Inoreader will display related articles and sources. You can follow individual sources or the entire collection.
- Search Custom Keywords: If the provided topics don’t suit your needs, use the search bar to enter keywords (e.g., “Health” or “Nutrition”) and follow relevant feeds.
- Add Feeds Manually: Use the Add Feed option in the left menu to follow a collection or add custom feeds based on your specific interests.

Creating an Inoreader Module
Introduction to MAKE Scenarios

MAKE enables automation through a feature called scenarios, which executes specific actions repeatedly. These scenarios are built using nodes, each representing a tool or action, connected to perform an overall workflow.

For this guide, we will create a scenario that fetches articles from Inoreader, processes them using ChatGPT, and automatically posts the content to WordPress.
Setting Up Inoreader Integration with MAKE
Log in to MAKE: Log in to your MAKE account and click Create New Scenario.
Add the Inoreader Module:
- Click the large + button to access the app selection menu.
- Search for Inoreader and choose the desired functionality.
Key Functions:
- Watch Articles: Real-time monitoring for new posts.
- List Articles: Fetches current articles from your feed.
For testing, use List Articles to verify that the module works correctly. Later, you can switch to Watch Articles for real-time monitoring.

Automation Scenario Setup and Testing
Create the Connection:
- Add the Inoreader module and click Create a connection.
- Complete the login and authentication process to link Inoreader and MAKE. This is a one-time setup.

Select the Folder:
- Choose the folder created earlier, such as the “Sports” folder.
- Set the Limit field to
1to fetch the most recent article and click OK.

Verify Module Operation:
- Right-click the module and select Run this module.
- Once the process completes, the module will turn green, indicating successful operation.
- The execution results on the right will display details such as the article title, category, and publication date fetched from the RSS feed.
By completing these steps, you’ve successfully integrated Inoreader with MAKE, ready for automation.
Using the HTTP Module to Collect URLs
Overview of the HTTP Module
The HTTP module in MAKE is used to fetch content via URLs. It plays a key role in retrieving the data we need by accessing web content linked to the URLs collected from RSS feeds by Inoreader. This is the starting point for extracting the information contained in these web documents.
Setting Up the HTTP Module

Add the HTTP Module
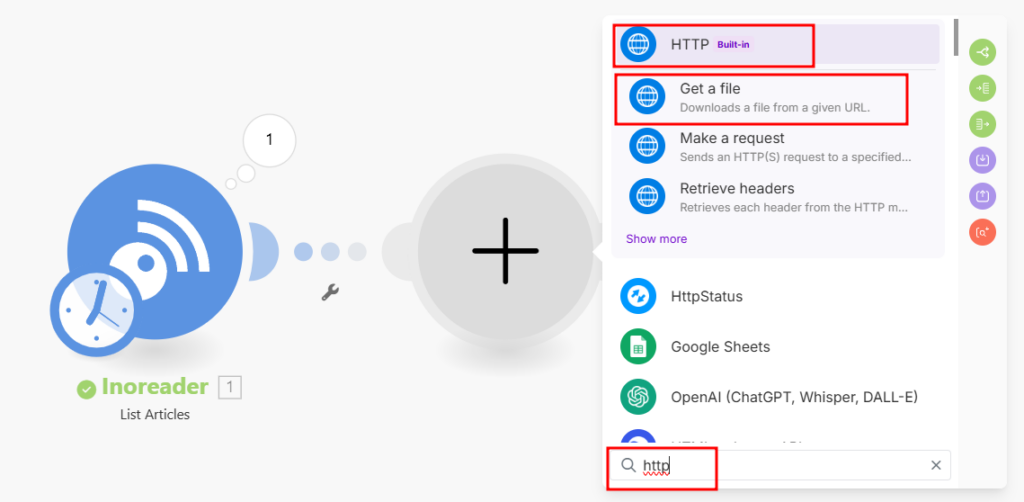
- Click the + button next to the previously configured Inoreader module.
- Search for HTTP in the module list and select it.
- From the HTTP functions, choose Get a file. This function allows you to fetch web content via a specified URL.
Configure the URL Input

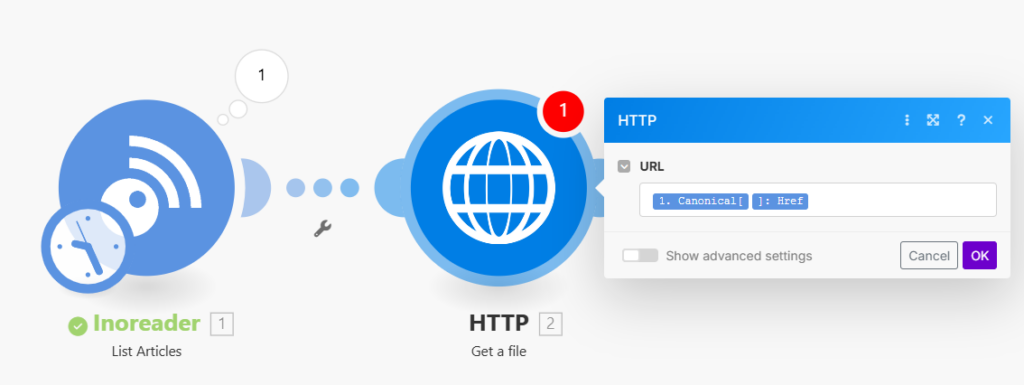
- In the URL field of the HTTP module, you need to input the document URL collected by the Inoreader module.
- Click the input field and use the dropdown menu to select canonical URL.
- To ensure you pick the correct URL, expand the dropdown by clicking the small arrow next to the field and choose href under canonical URL.
- Once selected, click OK to save the configuration.

Testing the HTTP Module
Run the Scenario
- Do not test the HTTP module alone by selecting “Run this module only.” Instead, ensure it works together with the Inoreader module by clicking Run once at the top of the scenario editor.

Verify Integration
- If the test completes successfully, the names of both the HTTP and Inoreader modules will turn green. This indicates that the modules are working properly.

Check Results
- To view the test results, click the number (e.g.,
1) that appears at the top-right corner of the HTTP module. This will display the retrieved data.
Reviewing the Collected Data

- The Input section of the HTTP module will show the URL provided by the Inoreader module.
- The Output section will display the HTML content fetched from the URL.
- Use this data to review the content of the document and extract additional elements if needed, such as metadata, text, or specific HTML attributes.
This setup allows seamless integration of Inoreader and HTTP modules, enabling the efficient collection and processing of web content for further automation.
Extracting HTML Content with the Text Parser Module
Role of the Text Parser Module
HTML documents often contain complex structures and tags, making manual content extraction tedious and time-consuming. The Text Parser module in MAKE simplifies this process by converting HTML into plain text. This allows you to extract meaningful content from HTML documents in a clean and organized format.
Adding and Configuring the Text Parser Module

Add the Module
- Click the + button next to the previously configured HTTP module.
- Search for Text Parser in the module list and select it.
- Choose the HTML to Text option to enable the module to transform HTML content into readable text.
Configure HTML Input

- In the HTML input field of the Text Parser module, select the data from the HTTP module that contains the HTML content.
- This links the output of the HTTP module (HTML content) to the Text Parser module for processing.
Connecting the HTML Input and Testing

Save and Run the Test
- After configuring the HTML input, click the confirmation button to save your settings.
- Run the scenario by clicking Run once to initiate the test.
Handling Warnings
- A warning message may appear, indicating that the parsing module cannot end the root scenario.
- This occurs because automation scenarios need a final output module. Since this is a mid-stage process, ignore the warning and proceed with the test.
Reviewing the Text Conversion Results

Check the Results
- After the test completes, verify the Text Parser module’s execution results.
- The output should display the HTML document converted into plain, readable text.
Analyze the Converted Text
- Observe that all unnecessary HTML tags and elements have been removed.
- Only the meaningful content of the document is retained in a clean format, ready for further processing or posting.
Key Notes
- Ensure that the HTTP module successfully provides HTML data to the Text Parser module before running tests.
- The converted text can now be processed further, such as summarizing with an AI tool or directly posting to a WordPress site.
This setup streamlines the process of extracting clean, usable content from complex HTML documents, significantly enhancing automation efficiency.
Generating Blog Titles, Content, and Images Using ChatGPT
Writing Blog Posts with ChatGPT API
By utilizing the ChatGPT API, you can automatically generate blog content based on the data you’ve collected. This is achieved by adding the OpenAI module in MAKE, connecting the API, and leveraging the ChatGPT model. Note that API usage incurs costs, but small-scale writing tasks typically remain affordable.
Step 1: OpenAI API Key Creation and Integration
Create an OpenAI API Key
- Visit the OpenAI website and log in.
- Navigate to Products → API from the top menu.
- Click your account icon and select Your Profile.
- Under API Keys, click View API Keys and then Create New Secret Key.
- Enter a name for the key and click Create Secret Key.
- Copy the generated API key using the Copy button.
Connect OpenAI to MAKE
- Add the OpenAI module in MAKE and select the “Create a completion” option.
- In the Connection field, click Add, paste the API key, and click Save.
- The connection between MAKE and OpenAI is now established.

Step 2: Configuring the ChatGPT Module
Select API Method and Model

- Set the Method to Create Chat Completion.
- Choose the model ChatGPT 4o-mini to save token costs while maintaining high-quality results.

Setting Tokens
- Define the maximum token count (e.g., 2000 tokens) for generating medium-length blog posts.
Step 3: Setting Prompts for Blog Content
Effective prompts are crucial for high-quality outputs. Use the following prompt structure:
System Message
- Set the role to System and define ChatGPT’s role as a blog expert. For example:
- “You are a blog expert. Write professional blog articles in a clear and SEO-optimized format.”

User Message for Style
- Set the role to User and describe the desired blog style or provide examples. For instance:
- “Write in an engaging tone similar to [example blog].”

Content Prompt
- Add another User message to instruct the model on content creation. Use parsed data or collected articles as input, such as:
- “Based on the following parsed data, write a blog post of approximately 2,000 characters.”


Step 4: Testing and Finalizing the Content
Run a Test
- Once all settings are configured, click Run once to generate a sample response from ChatGPT.
- Review the output to ensure the generated content meets expectations.
Verify the Results

- Check for the quality of the blog post, including structure, grammar, and relevance to the input data.
Tips for Optimization
- SEO Keywords: Incorporate target keywords into the prompt for SEO optimization.
- Content Length: Adjust token limits to control the length of the output.
- Revisions: Iterate on the prompts to refine the tone and content style.
By completing these steps, you can efficiently automate the process of generating professional blog posts, saving time while maintaining quality.
Generating Titles Using ChatGPT API
Creating a compelling blog title is essential for summarizing the content and capturing readers’ attention. You can automate title generation using the OpenAI module in MAKE. The setup is similar to generating blog content, but with adjusted prompts to focus on creating titles.
Step 1: Configure the OpenAI Module
Add a New OpenAI Module
- In MAKE, add a new OpenAI module to your scenario.

Select Module Options
- Module Type: Create a chat completion
- Model: GPT-4o mini (for efficient performance and token usage)
- Connection: Use the OpenAI API connection created in earlier steps.

Step 2: Add a System Message
Define ChatGPT’s Role
- Set the Role to System.
- Enter the following in the Content field:
“You are a blog writing expert. Based on the provided content, create a concise and engaging title for the blog post.”

Purpose: This instructs ChatGPT to act as a blog expert and focus on generating an appropriate title based on the input content.
Step 3: Add a User Message
Provide Blog Content
- Set the Role to User.
- In the Content field, input the blog post content generated earlier. This can be linked dynamically to the output from the Text Parser module or any other data source.

Purpose: This allows ChatGPT to analyze the blog content and generate a title that aligns with the post’s theme and tone.
Step 4: Finalize Settings and Test
Set Maximum Tokens
- Limit the Max tokens to
50, as titles are brief and don’t require many tokens.
Save and Run the Test
- Click OK to save the settings.
- Run the module by clicking Run once.

Check the Results
- In the result window, review the generated title to ensure it is concise, engaging, and relevant to the blog content.
Tips for Effective Title Generation
- Optimize the System Prompt: Include specific criteria like SEO-friendliness or tone (e.g., professional, friendly).
- Adjust Content Input: Ensure the provided content is clear and descriptive to help ChatGPT create a precise title.
- Test Multiple Variations: Run several iterations with slight adjustments to prompts for optimal results.
By automating title generation with ChatGPT, you can save time while ensuring your blog posts are well-presented and appealing to readers.
Generating Images Using ChatGPT API (DALL·E 3)
To generate images that complement your blog posts, you can use OpenAI’s DALL·E 3 model. By leveraging text-based prompts, you can create visually engaging images tailored to your blog’s content. This process uses MAKE’s OpenAI module to automate image generation based on your blog post titles.
Step 1: Configuring the OpenAI Module
Add a New Module
- In MAKE, add a new OpenAI module to your scenario.

Select Module Options
- Module Type: Generate an image
- Model: DALL·E 3
- Connection: Use the OpenAI API connection created earlier.
This setup enables the use of the DALL·E 3 model for image generation.
Step 2: Setting the Prompt with Title Integration
Craft the Image Prompt
- Use a dynamic prompt based on the blog title generated in the previous step.
- Example Prompt:
- “Create an image that fits the following title: {Generated Title}. Make the image visually engaging and relevant to the title content.”

Link the Title
- Connect the title output from the title generation module to the prompt field.
- Ensure the prompt provides clear and specific instructions to DALL·E 3 for accurate and relevant image creation.
Step 3: Detailed Image Settings
Set Image Size
- Choose the appropriate size for your blog layout. For wide banner images, use:
- “1792×1024”
- This size works well for blog cover images or main banner visuals.

Set Response Format
- Select Image File as the response format.
- Avoid leaving the default URL format, as this may cause errors when processing the image output.
Step 4: Testing and Reviewing the Image
Save and Run the Test
- After configuring the module, click OK to save your settings.
- Run the scenario by clicking Run once.
Check the Results
- Review the generated image in the result window.
- Verify that the image aligns with the blog title and maintains high visual quality.

Tips for Effective Image Generation
- Use Specific Prompts: Include details about the visual style or elements you want (e.g., “minimalist,” “modern,” “vivid colors”).
- Iterate on Results: If the image is not aligned with your expectations, refine the prompt and re-run the test.
- Consistent Sizing: Use the same size settings across your blog for a uniform appearance.
By integrating DALL·E 3 with your workflow, you can automate the process of creating unique, professional-quality images tailored to your blog posts.
Converting Markdown to HTML
ChatGPT generates blog content in Markdown format by default. However, WordPress recognizes and processes HTML for document structure, making it necessary to convert Markdown into HTML. This ensures that elements like titles, subheadings, and body text are properly reflected in WordPress.
Step 1: Add a Markdown Module
Add a New Module
- In MAKE, add a new module to your automation scenario.
- Search for Markdown in the module list and select Markdown to HTML.

Set the Source
- In the source field, link the output from the ChatGPT content generation module.
- This connects the Markdown-formatted text to the module for conversion.
Step 2: Configure the Markdown Module
Conversion Type
- Set the conversion type to “Markdown to HTML”.
Input Source
- Select the content generated by ChatGPT as the input.
- This ensures the module converts the Markdown-formatted blog post into an HTML structure.

Step 3: Review the Converted HTML
- Once the conversion is complete, the output will be in an HTML format that WordPress can process.
- Key structural elements like headings, paragraphs, and lists will be converted into corresponding HTML tags (
<h1>,<p>,<ul>, etc.).
Step 4: Testing and Integration
Run a Test
- Save the module settings and click Run once to test the Markdown-to-HTML conversion.
- Verify that the output is a valid HTML representation of the original Markdown content.
Review the Output
- Ensure the HTML structure matches the intended format, with properly nested tags for headings, paragraphs, and other elements.

Advantages of HTML Conversion
- WordPress Compatibility: HTML ensures the blog structure is correctly interpreted by WordPress.
- SEO Optimization: HTML tags improve SEO by defining document structure for search engines.
- Uniform Formatting: Converted HTML aligns content formatting across platforms.
This process streamlines content integration into WordPress, enhancing both functionality and presentation.
Publishing Posts on WordPress
Uploading Images to WordPress
To upload images generated by ChatGPT API to WordPress, you need to ensure that the images are pre-uploaded before publishing the blog post. This ensures both the text and images are correctly displayed together.
Step 1: Setting Up the WordPress Image Upload Module
Add a New Module
- In MAKE, add a new module to your scenario.
- Search for and select Create a Media Item.

Configure WordPress Account Connection
- Establish a connection between MAKE and your WordPress account.

Step 2: Setting Up WordPress API Connection
Install the Make Connector Plugin
- Go to your WordPress dashboard.
- Navigate to Plugins → Add New.
- Search for Make Connector, install, and activate it.

Generate an API Key
- Open the installed Make Connector plugin.
- Generate an API key and copy it for use in MAKE.

Connect to WordPress via MAKE
- In MAKE, open the WordPress module and click the Add button under Connection.
- In the WordPress REST API URL field, enter your blog’s URL followed by
/wp-json/.- Example:
https://yourblogurl.com/wp-json/
- Example:
- Paste the API key you generated in WordPress into the API Key field.
- Click Save to complete the connection.

Step 4: Configuring the Image Upload
Set the Data Field
- Use the response data from the image generation module (e.g., DALL·E 3) as the file source.
Set File Name
- Use the blog title generated earlier as the file name, ensuring the extension is
.png. - Example:
{Generated Title}.png.
Save Settings
- Once the file and naming settings are configured, save the module.

Step 5: Testing Image Upload
Run the Test
- Click Run once to test the image upload process.
- Ensure that the image is successfully uploaded to your WordPress media library.
Verify in WordPress
- Check your WordPress media library to confirm the image is present and correctly named.
Next Steps: Integrating Text and Images
Once the images are uploaded, they can be linked to the corresponding blog post in the WordPress post module. By automating this process, you can seamlessly publish blog posts with both text and images, streamlining your workflow.
Automating Blog Posting on WordPress
With both the blog content and images prepared, the next step is to automate posting them to WordPress. This process combines the HTML-converted content and the uploaded image into a complete blog post.
Step 1: Add the Post Creation Module
Add a New Module
- In MAKE, add a new module to your scenario.
- Select Create a Post from the available WordPress module options.

Configure the Module Settings
Title: Use the output from the title generation module.

Content: Select the HTML-converted blog content from the Markdown to HTML module.

Type: Set to “Post” to classify the entry as a blog post.

Featured Media ID: Use the media item ID from the image upload module.

Step 2: Additional Settings
Summary: Provide a brief excerpt or let it generate automatically based on the content.
Tags and Categories: Assign tags and categories relevant to the blog post.
Publishing Status:
- Set to “Publish” for immediate posting.
- Use “Pending” if you prefer to review the post before publishing.

Step 3: Testing and Finalizing Automation
Run the Test
- Click Run once to execute the automation scenario and test if the modules function correctly.
- Verify that the title, content, and image are correctly integrated into the post.
Check the Result
- Log into your WordPress dashboard and view the newly created post.
- Confirm that the formatting, images, and metadata (tags, categories) are as intended.

Tips for Efficient Automation
- Scheduling Posts: If you want posts to go live at a specific time, use the scheduling feature in WordPress and set the post date accordingly.
- Error Handling: Add conditional logic in MAKE to handle potential errors like missing images or content.
- Reusability: Save this scenario for recurring blog automation tasks to streamline future workflows.
Once set up, this automation ensures seamless posting of fully formatted blog posts with minimal manual intervention, boosting productivity and consistency.
Modifying the Inoreader Module for “Watch Articles”
Step 1: Replace the Inoreader Module
Delete the Existing Module
- In your MAKE scenario, remove the current Inoreader module.

Add the “Watch Articles” Module
- Search for Inoreader in the module list and select “Watch Articles”.

Step 2: Configure the “Watch Articles” Module
Set Trigger Timing
- Under “Choose where to start”, select “From now on” to detect new uploads starting from the current moment.

Step 3: Update the HTTP Module
Update the URL Field
- Since the Inoreader module has been replaced, ensure the URL field in the HTTP module is updated to pull URLs from the new “Watch Articles” module.
- Check and map the appropriate field dynamically.

Step 4: Enable Scheduling
Set Upload Frequency
- Define how often the scenario should run (e.g., every 5 minutes, hourly).
- Toggle the scheduling button to ON to activate automated execution.

Conclusion
This concludes the basic setup for automating WordPress posts using MAKE. With this guide, you now have a working foundation for your automation.
You can enhance and customize your workflow by incorporating additional logic or integrating other tools to suit your specific needs. Experiment and refine your automation to make it even more efficient!


